The Pitfalls of Bad Vacuum Gauge Placement
Have you ever wondered why your old refrigerator never needs service, gauges installed, and can run for 30 years that way maybe only needing an occasional cleaning of the condenser? For crying out loud, utilities are buying these old energy hogs through some programs because they never seem to die. Why do they last so long? A good evacuation, a correct refrigerant charge, and maintaining a sealed system. Evacuation is the most important part of an installation followed by charge and airflow to assure the efficiency, reliability, and longevity of equipment.
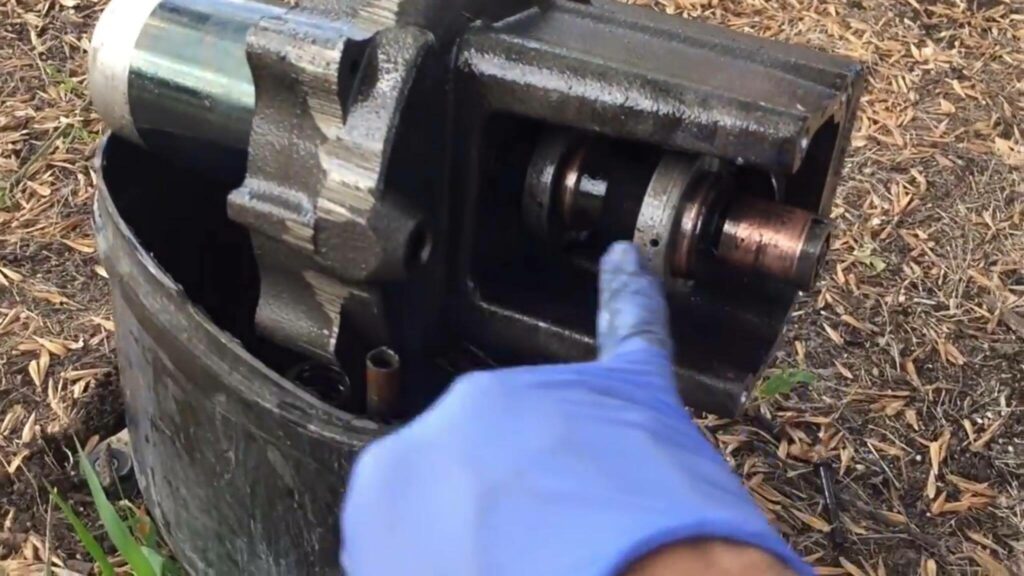
When it comes to evacuation, in an industry plagued with bad information, I do not know why I was surprised to learn that many technicians think it is OK to measure the system vacuum at the vacuum pump. Now I wouldn't say it's like driving from the back seat of a car, only because it's much worse than that. It's more like driving blind from the trunk. In my opinion, a senseless practice, and simply poor practice when it comes to proper evacuation. If you hate your micron gauge and think that evacuation is impossible or dark magic, I think we have stumbled across the reason.
Now I am not going to blame technicians for this, as somewhere along the line, (likely when the marketing department took over engineering) the 1/4" test port on a vacuum pump became a service port for evacuation and at times a mounting point for the vacuum gauge and the pump blank off valve became the isolation valve for vacuum. I know this is true because I have talked to many salesmen at tradeshows who have confirmed this to be their understanding.
But here is what is important to understand, the 1/4" test port is nothing more than that, it is a test port. It is designed to provide a port to test the ultimate pulldown vacuum of a vacuum pump. It is not, and was never intended for evacuation or a permanent location for the vacuum gauge, and the blank-off valve is not intended to isolate the vacuum from the system.
Let's start with some basics. Pressure and vacuum are two completely different sciences and cannot be treated the same. Here is a fundamental example. Given a straw, you could easily blow out a candle a foot or more away. Take that same straw and try to suck the candle out, and even inches away it is not possible. Vacuum is not directional, if you have ever used a cracked straw, you know they are pretty much useless for drinking. The vacuum pulls from wherever it can. A vacuum is simply a reduction in pressure, and it is strongest at the pump inlet and gets weaker and weaker as it moves away from the pump toward the system. This is due to friction and leakage, which means the vacuum is weakest at the furthermost point away from the pump.
The pressure differences are extremely small that create the flow back to the vacuum pump. These pressures are typically as low as .002 psi. Remember, a vacuum is limited by physics. The deepest vacuum we can achieve is -14.996 PSIG. That said, the only way to reduce the friction and increase the flow is larger hoses. A 1/4" hose has such a low conductance speed that it should never be used for evacuation. Using a 1/4" hose chokes the vacuum pump—no matter how big—down to about 0.5 CFM at 1,000 microns. Hoses that are 3/8" or 1/2" inside diameter are the smallest that should be used for evacuation. That said, the vacuum at the hose inlet can be much more different than the vacuum at the pump connection, and again, much more different at the far end of the system.
 But wait, there's more! Schrader cores provide additional pressure drops, and we all know there are times when
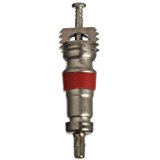
the core depressor either does not open or barely opens the Schrader valve. This will also play havoc in the evacuation process. These pressure drops, again, will make the vacuum at the pump much deeper than it is in the system. The reality is your pump could be at 250 microns while the system is still well over 2,000 microns. This could lead to catastrophic failure of the refrigeration system over time.
Vacuum pump blank off valves leak! Vacuum pump blank-off valves are designed for nothing more than keeping the oil in the pump when the pump is turned off with the hoses connected, in the case of a tip over, and to keep the oil from absorbing large amounts of moisture while the pump is stored. They are not vacuum rated, and if tested with a micron gauge, most–if not all–will creep toward atmospheric pressure in a matter of minutes. This is the primary reason for vacuum trees with vacuum rated ball valves. Those are intended for that purpose. They are not there only to provide a connection point for multiple hoses. The blank-off valve on the evacuation tree, or evacuation manifold, are less than ideal for system decay testing as it also does not isolate the core tools and hoses that are also a significant source of potential leakage, if for no other reason than simply the huge amount of connections. The reason the blank-off should be closed during isolation is to keep the oil from sucking out of the pump when the vacuum rig is under a vacuum and the pump is off. If you are testing the ultimate pulldown of the pump with a micron gauge, closing the blank off prior to shutting down the pump is critical as you will easily pull oil into the vacuum gauge if you shut the pump off before doing so.
So what is a technician to do? After all, there is no other convenient place to install the vacuum gauge on a typical system, there are only two ports on the entire residential system. The answer is vacuum rated core tools. Using core tools allows two important things to happen. First, removal of the core which is a significant restriction, and second, it provides a place for the vacuum gauge that allows isolation of the vacuum pump and hoses. While a core tool is not 100% leak free, down to about 20 microns, a good core tool will not be a significant source of leakage when the valve is closed and the system is isolated. Core tools should be cycled several times during evacuation to release any trapped air around the valve, but aside from that, the only source of leakage during isolation at that point is between the ball valve and the service port on the system. If a non-permeable connector is used for the vacuum gauge, the source of leakage not has been significantly reduced if not for all intensive purposes, completely eliminated.
Just recently I was reading a post online that "vacuum rated" is nothing more than an industry buzz term. Nothing is further from the truth. Everything leaks, even solid copper lines! It is the leak rate that we are concerned with. Vacuum rated defines the performance under a vacuum and clarifies the leak rate of the core tools or the hoses tested. It tells the user the ultimate vacuum that the tool will perform to without the leakage rate overcoming the ability of the pump at the rated micron level. Vacuum rated means it was tested for the process of evacuation and can be expected to perform adequately down to the rated level. This does not mean that standard core tools cannot be used, but it does mean that the user should test them for the intended purpose to assure that they are tight enough to perform without being a significant source of a leak in a vacuum.
Because hoses, the vacuum pump blank-off valve, manifolds, and core tools leak, we need to either remove or isolate as many of these components as we can from the system during the decay test. Just to be clear, evacuating through a manifold is not a great idea either, as the small porting and hoses also are a significant restriction. Core tools, and a proper evacuation rig allow a good evacuation to happen. Making a few small changes in your approach to evacuation will make a huge difference in your frustration level, and make the system last years longer.
PS. Open the gas ballast if equipped before starting the pump, close it when you hit 1500 microns, then open it again after you have isolated the pump/rig for a few seconds prior to the pump shutdown. This will help keep your oil dry, and assure that you achieve maximum vacuum during the evacuation. It will also help your pump last longer.
Why Hitting 500 Microns is Not Enough!
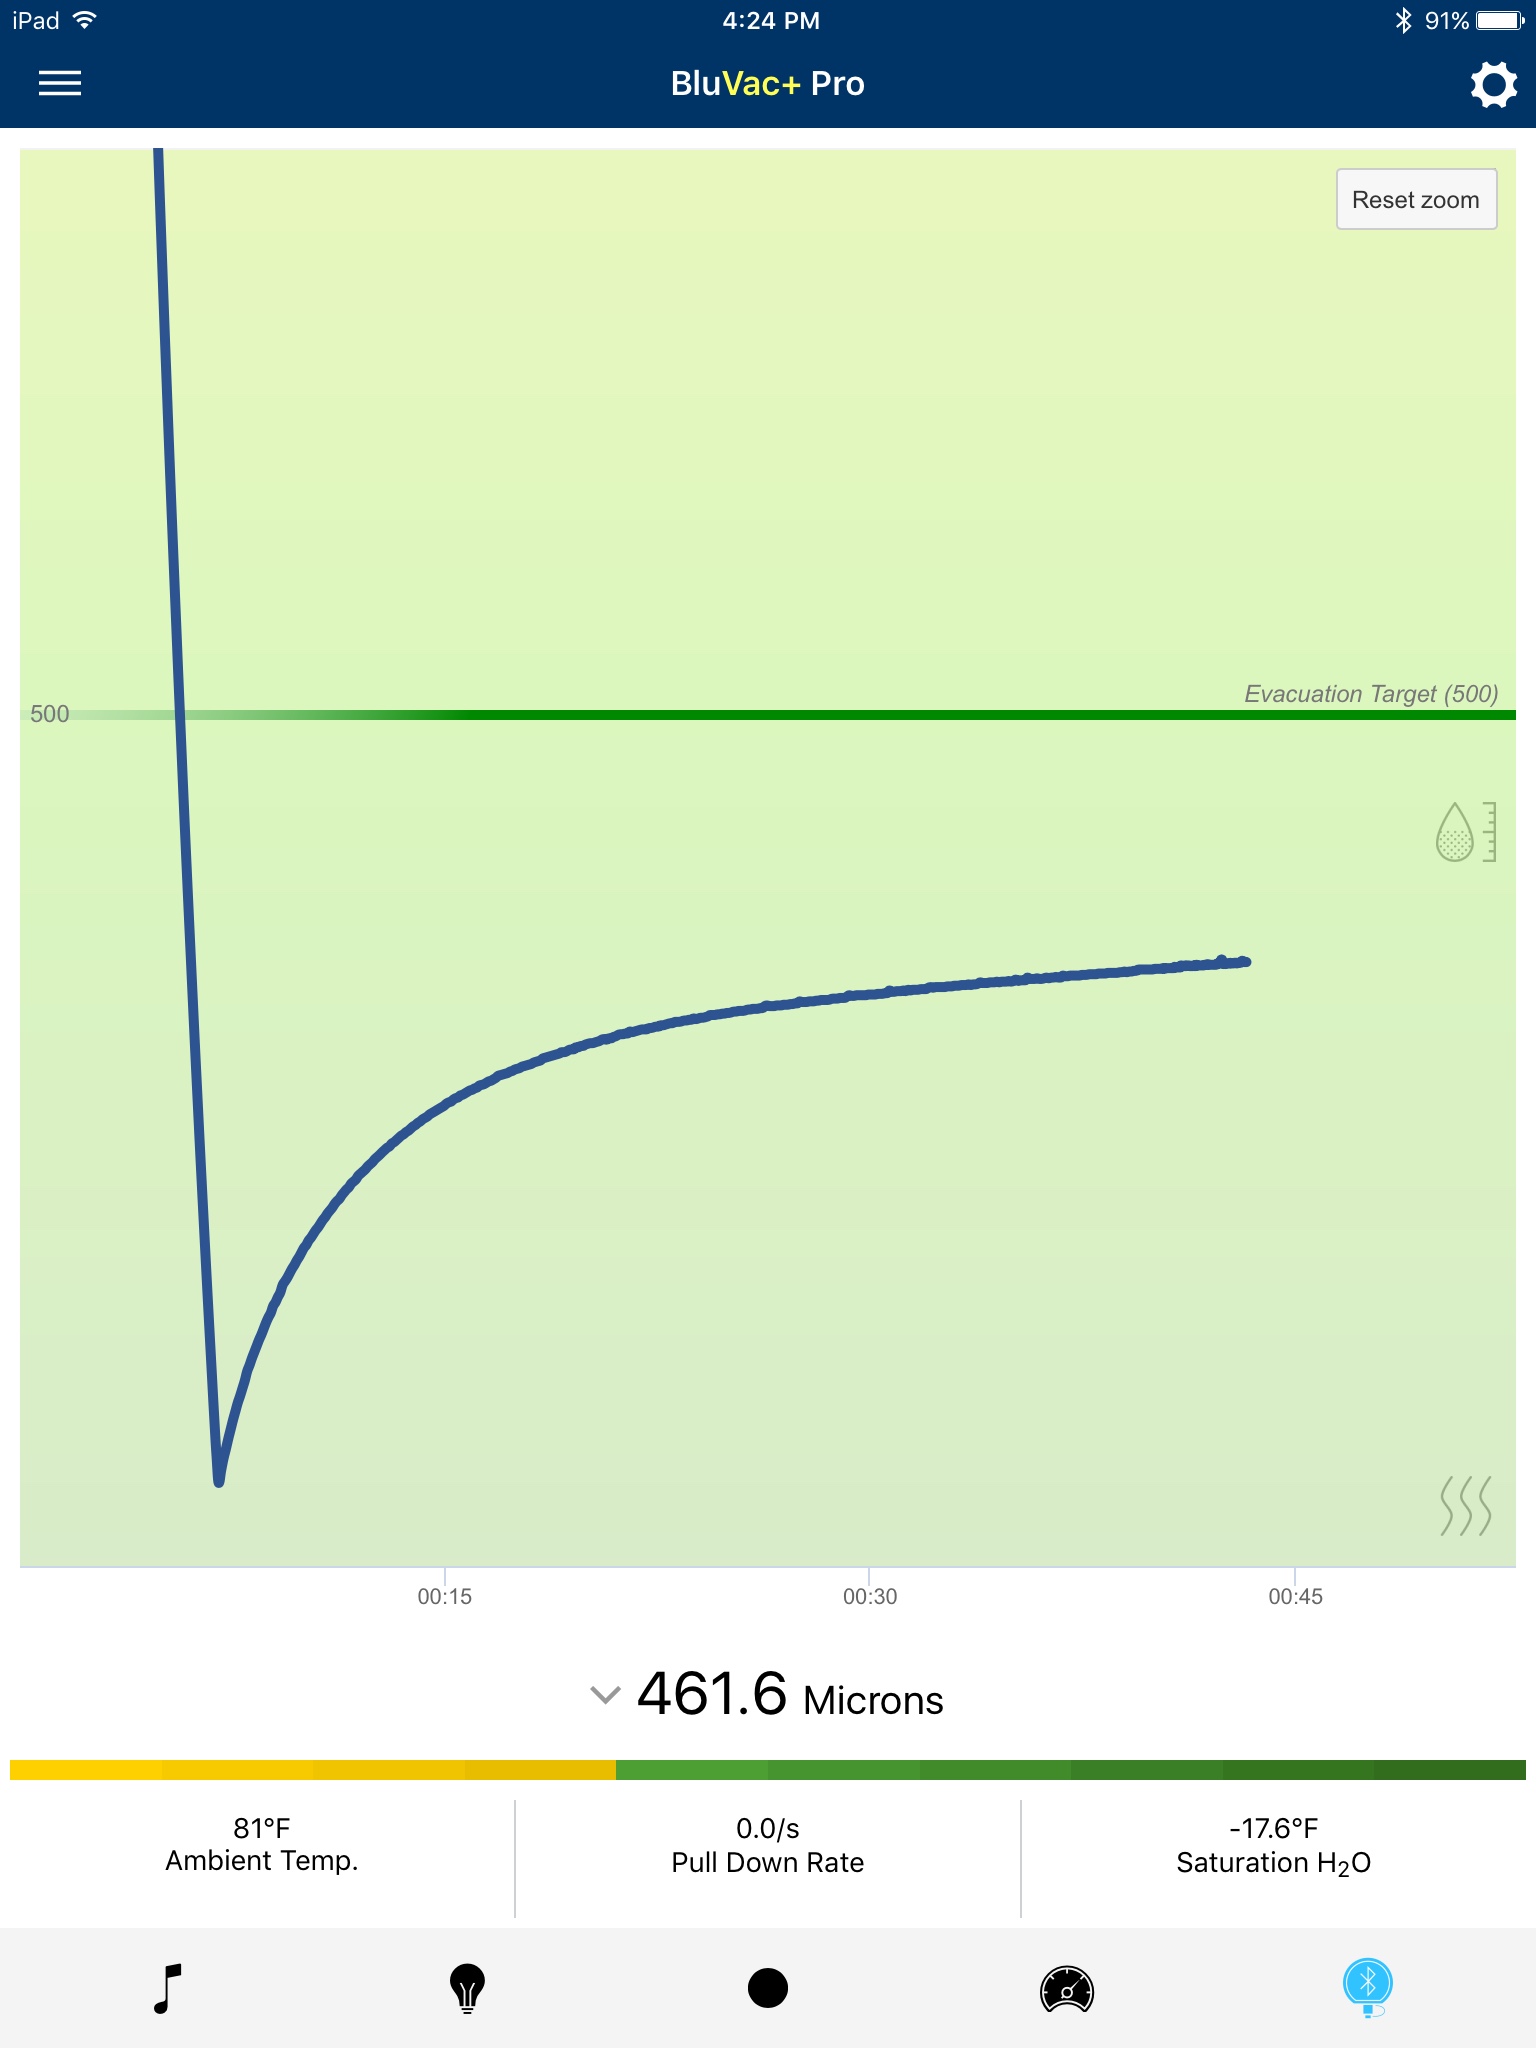
As a primer to this post, I would not have done the evacuation quite this way, with multiple pulldown and isolations at 500 microns, the goal was to demonstrate the characteristics of a system with moisture and to prove that "hitting 500 microns" is not enough. Hitting 500 microns in no way shape or form guarantees that the system is clean and dry enough for the introduction of refrigerant. Adding a Shrader cap full of water to this dry recovery tank will demonstrate why. We are using the BluVac+ Professional vacuum gauge and a free app developed by MeasureQUICK that will demonstrate the strong visual indication of moisture in a system.
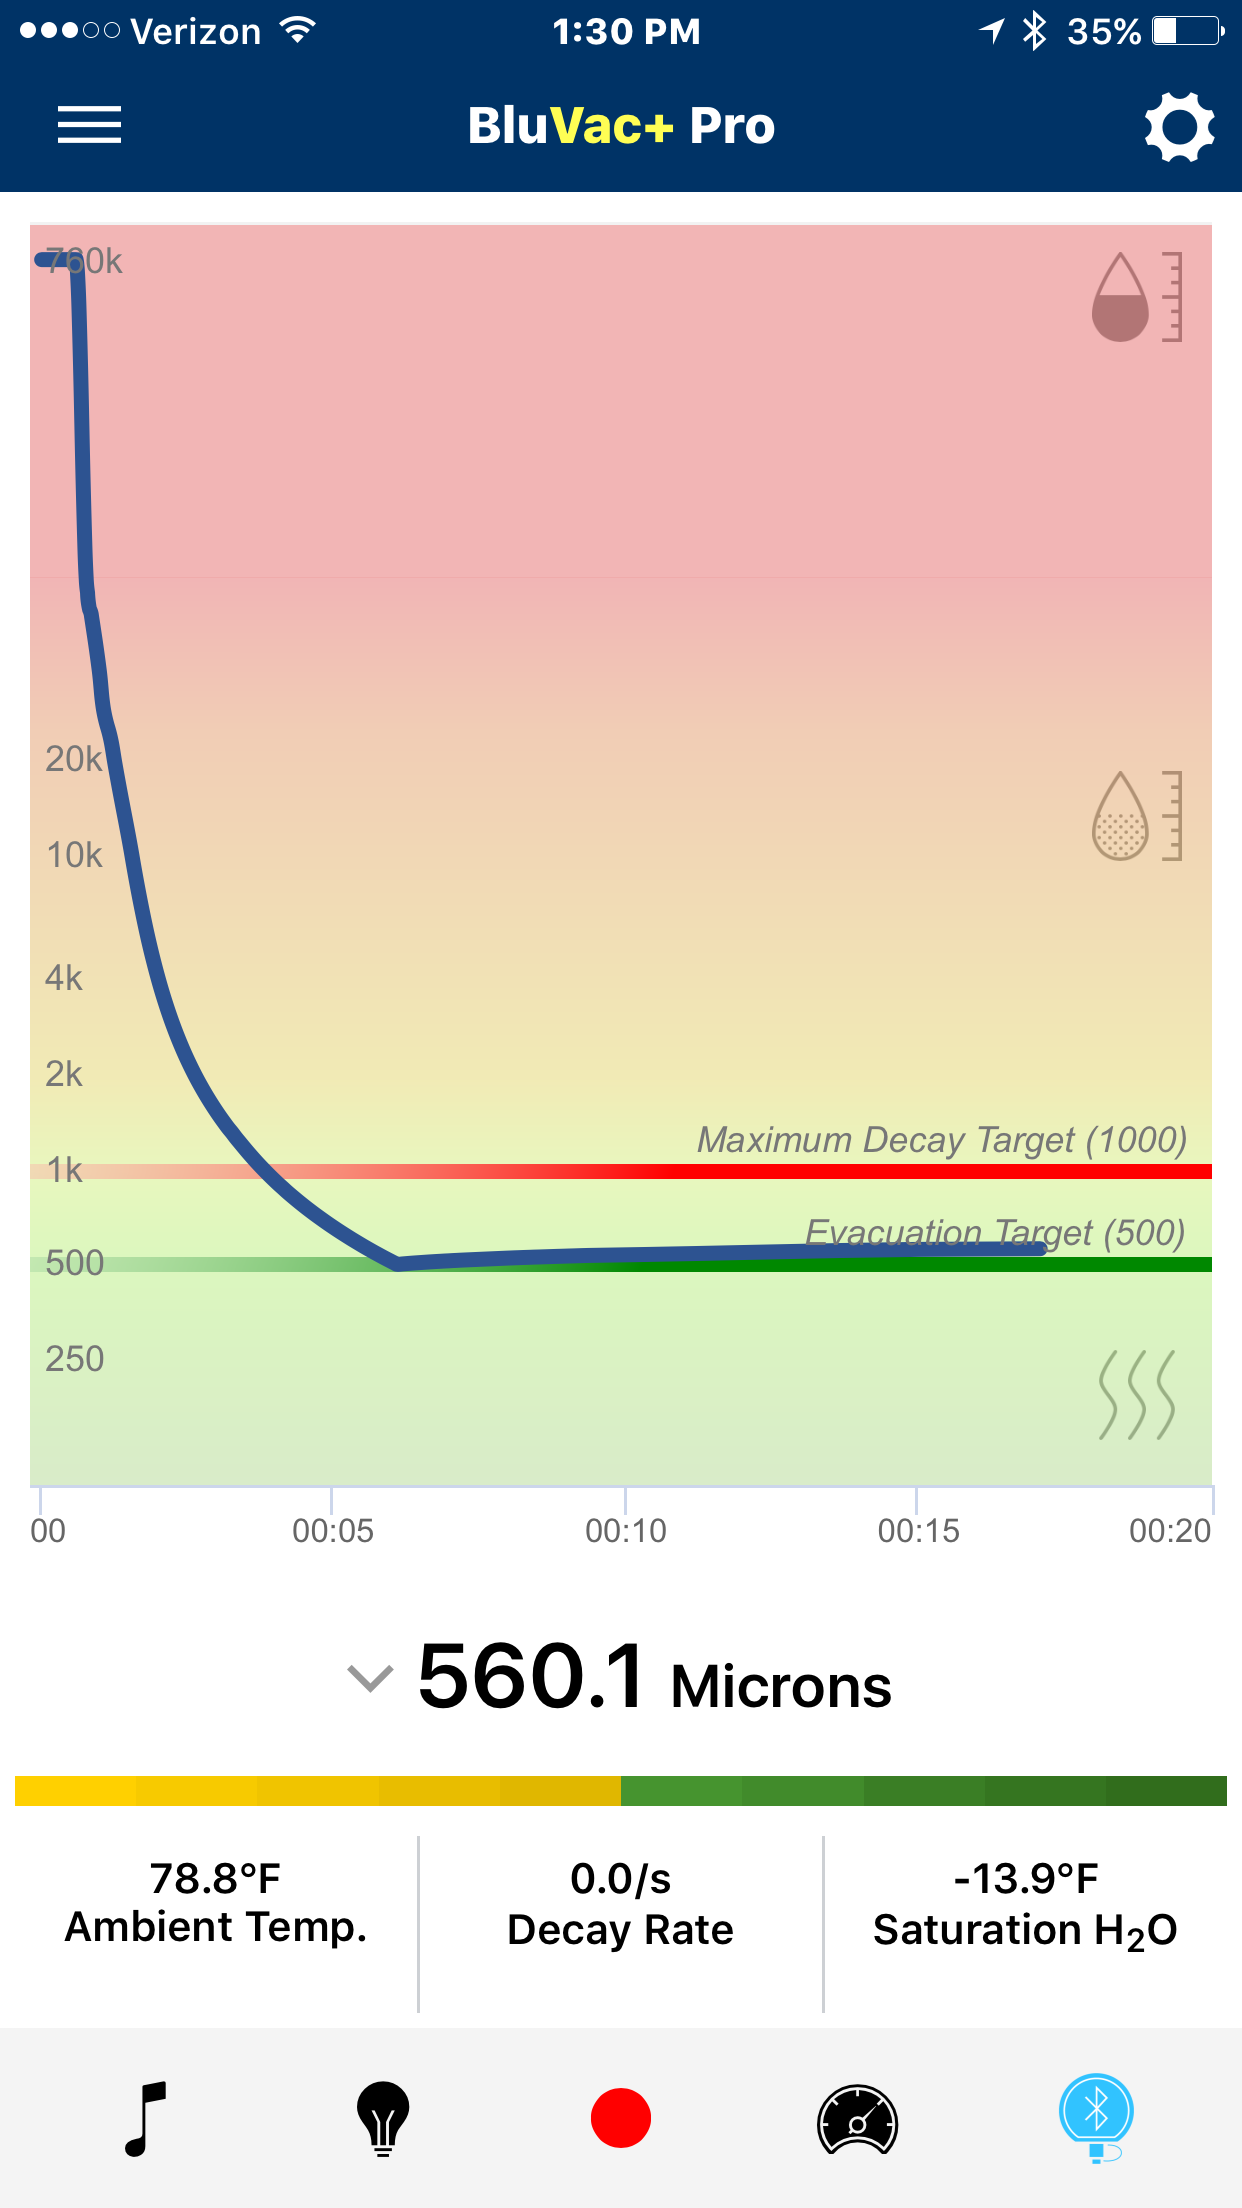
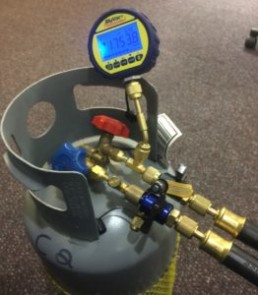
Above is an example of a clean dry recovery tank, at vacuum isolation, with the gauge located at the opposite end of the system from the pump. I am evacuating with a 1/2" hose on the vapor side and measuring on the liquid side above a dip tube. This is how an evacuation should look on a system that is purged with nitrogen during installation, and the tubing kept dry during shipment and installation. It pulled down and held in about 6 minutes. At isolation there is no significant rise, the decay effectively flatlines at less than 0.0 microns/second. Waiting 10 minutes to see the final decay took longer than the evacuation itself.

Do demonstrate moisture contamination, with the tank under a vacuum, I introduced a Schrader cap full of moisture into the system, broke the vacuum to the atmosphere, and started again. With less than a thimble of water, you will notice that the evacuation time almost exactly doubled. It took 11 minutes and 46 seconds to hit the 500-micron mark, as removing water is work and takes time. After hitting 500 microns, at isolation, the tank pressure very quickly rises (decay). This shows hitting 500 did not do the job of dehydration. Even hitting 500 microns effectively at the far end of the system! The wet tank quickly decays over to 1000 microns before I restart the evacuation process. Likely it would have leveled out between 1500 and 2000 microns. The decay took 7.5 minutes. It should also be noted that the amount of moisture was so small that it did not stall the evacuation process. There is a small shift in the curve, and the time increased, but the vacuum pump and the rig were able to boil off any large amount of moisture quickly, and now we are seeing the effect of the residual moisture that bonded to the walls of the tank. Notice even after several minutes the decay rate is .3 microns/second. The tank is still outgassing significantly.
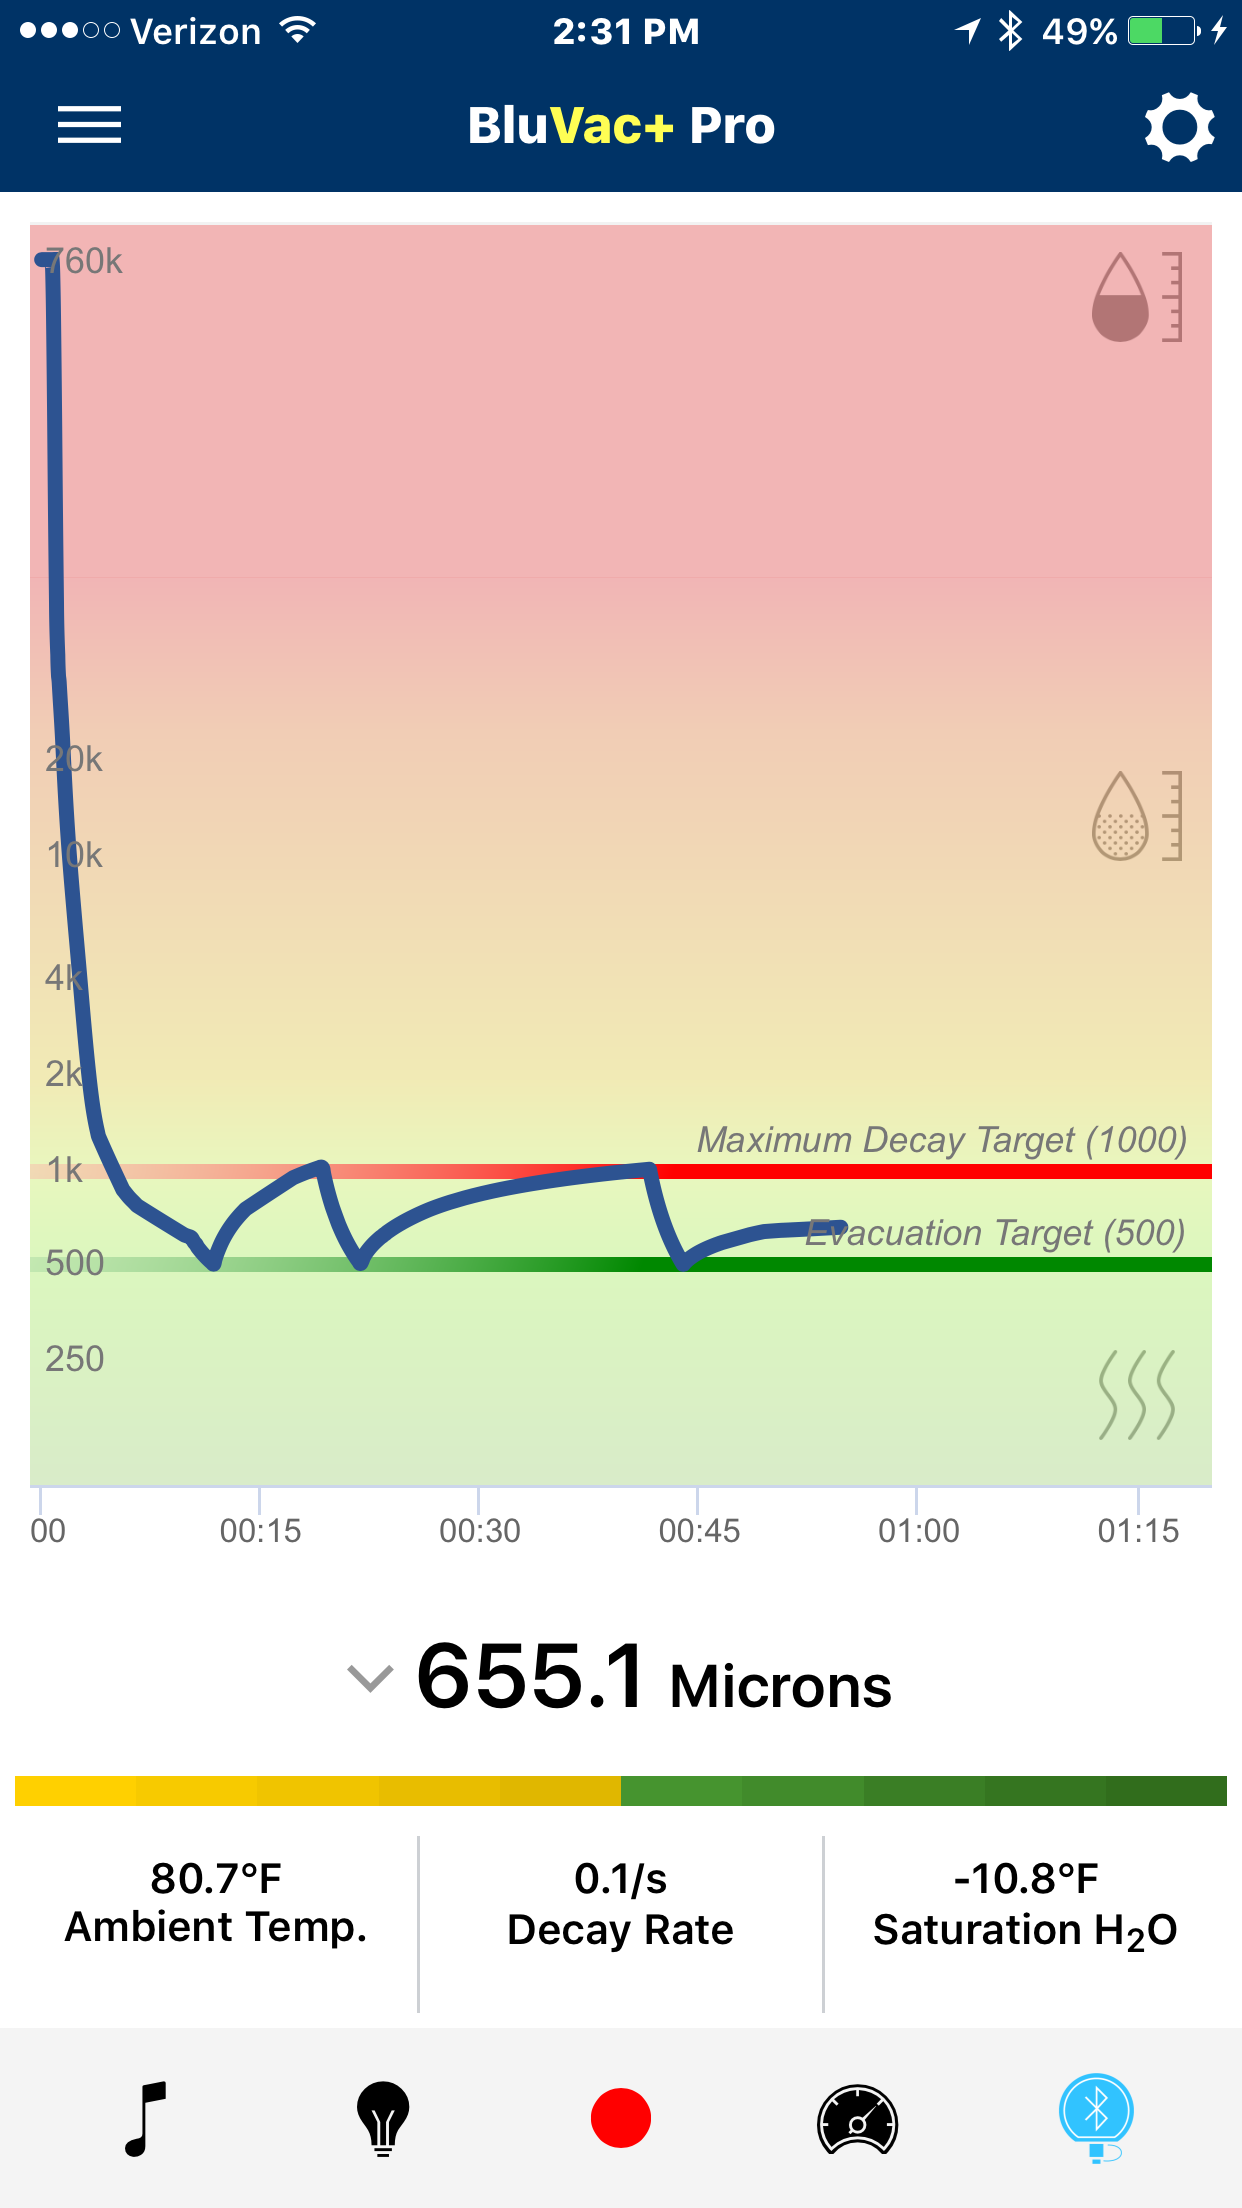
The evacuation was restarted, and even after second time hitting 500 microns, the tank still eventually decayed to over 1000 microns. The decay took 20 minutes, but regardless of the time, (and many technicians would not have waited this long) it is important to note that the tank is still very wet. Introducing refrigerant into this system over time would lead to a catastrophic failure. The decay time has increased significantly, but it is still going over 1000 microns, evidence that the tank it tight, but still very wet, and holding more moisture then we would want to depend on a filter dryer to remove, especially in a system containing POE oils.
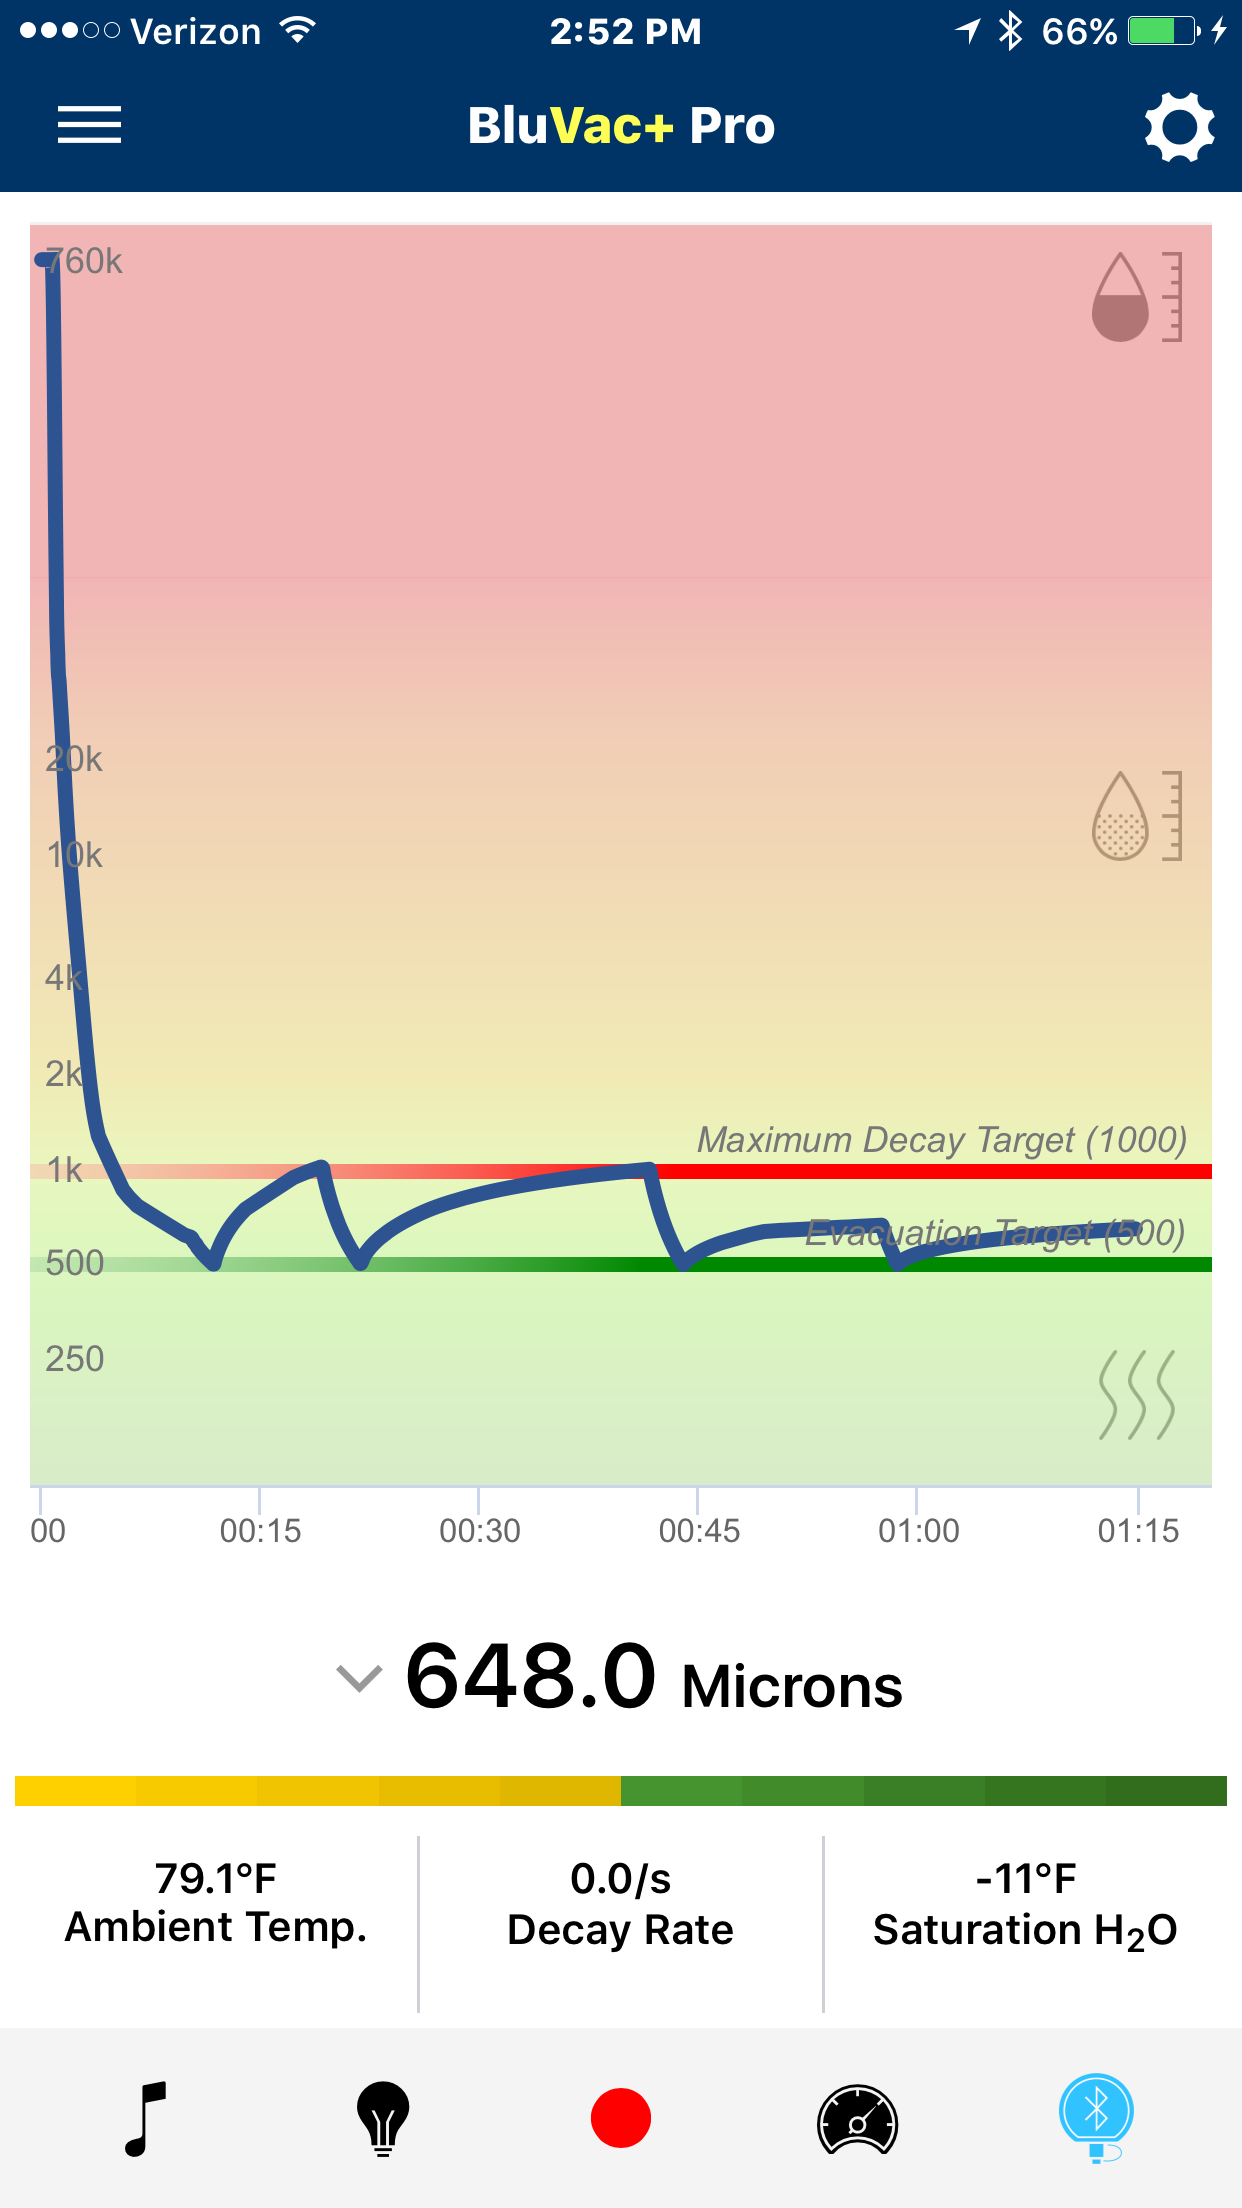
Above, the third time we hit 500 microns, the tank is decaying to the 300-micron range, it is starting to dry out, but additional time on the pump in my mind is warranted. I have personally seen the effects of moisture in compressor autopsies. Getting the moisture level as low as possible will assure longevity of the system, minimizing acid and sludge production. Notice we have a stable decay, indicating the true level of vacuum in the tank.

Pulled it down one last time to 250 microns and now the tank is holding about 300 microns with a leak rate of 0.0 microns/second. The tank is dry and tight. While we could have let it run down lower and more quickly removed the moisture, it is still worth noting that the moisture removal process took over 2 hours on a tank sitting in a 78-degree room. Notice how quickly the tank decay stabilized to 0.0 microns once the moisture was removed.
Removing moisture takes time, and as demonstrated here, hitting 500 is no guarantee that the system is ready for refrigerant. I cannot stress enough, you have to measure vacuum with the system isolated and allow time for the decay to stabilize before you determine the final level of vacuum. The vacuum must be isolated with core tools from the pump and the hoses. Do not rely upon a vacuum pump blank off valve to hold vacuum. Don't follow these procedures and you will deal with problems like those shown below.
Want to see the final report generated by the application? Final Report.
Next up, why you never should install your micron gauge at the vacuum pump!
How Long Should You Evacuate a System?
Anyone that has ever picked up a vacuum pump has asked or been asked this question, and to be truthful it is like asking "How many licks will it take to get to the center of a Tootsie Roll Tootsie Pop?" In the words of the wise old owl, "The world may never know."
Modern day  evacuation techniques are meant to degas and dehydrate a system, cleaning it of contaminants to a level that assures that non-condensibles – and more importantly, moisture – will cause no harm to the refrigerant or the refrigerant oil in the system. Moisture with oil forms sludge, and moisture with refrigerant forms hydrofluoric and hydrochloric acids. All of these can cause permanent damage to the refrigeration system.
How long an evacuation takes depends on many factors in this order, including but not limited to, the size of the system, the level of system contamination, the diameter and length of the vacuum hoses, the presence of the Schrader cores in the service valves, dryness of the vacuum pump oil, and lastly, the size of the vacuum pump.
More important than how long will an evacuation take is understanding when the evacuation is complete. Removal of the air is an easy process, but the removal of moisture is much more difficult and simply takes time. Moisture has strong molecular bonds and does not easily free itself from the surfaces it attaches to. It takes heat energy and time for the bonds to break and a deep vacuum for the pump to ultimately carry that moisture out of the system.
The best advice that can be given, when it comes to evacuation, is to make sure the preparation of the copper tubing is kept the primary priority. Keeping the system clean (contaminate free), dry and leak free during assembly will save far more time on the back end then the uncertainty it will introduce into the time required to clean the system through the evacuation process.
To properly clean (degas and dehydrate) the system, an accurate vacuum gauge is an indispensable component of the evacuation system. The use of an electronic vacuum gauge is the only way to determine when the dehydration process is complete. Using an electronic micron gauge like the BluVac+ Professional and its accompanying application will show you the characteristics of moisture allowing you to easily identify a wet vs a dry system. At 5,000 microns, 99.34% of the degassing has occurred, but the moisture removal is just beginning. If you cannot achieve a vacuum below 5000, it is a good indicator of a system leak, a leak in your vacuum hoses, contaminated vacuum pump oil, etc.
Once you are below 5,000 microns you can be assured that dehydration is occurring and that moisture is being boiled off and removed the through evacuation process. Significant levels of dehydration are not occurring until the vacuum level is below 1,000 microns.
When is comes to the vacuum gauge reading and the actual vacuum level, and an important distinction must be made. Pulling below 500 microns and being below 500 microns are two totally different things. A good vacuum rig coupled to a large pump can overpower the dehydration process, pulling below 500, but not removing the moisture which simply takes time. It is not until the vacuum has been isolated that we can determine the ultimate level of vacuum. Core tools are essential to isolate the vacuum pump and rig from the system when the ultimate vacuum level is being measured. The system needs to hold below the target vacuum to assure that adequate dehydration has occurred.
The following are guidelines for an acceptable standing level of vacuum. For systems containing mineral oil like R22 systems, a finishing vacuum of 500 microns with a decay holding below 1000 microns generally considered acceptable, whether we are talking a new installation or a system opened for service. For the system containing POE oil, like that of a R410a or R404a system, a finishing vacuum of 250 with a decay holding 500 microns or less should be achieved, and never a decay rising over 1,000 microns on an R410a system opened for service. For ultra-low-temperature, refrigeration, a finishing vacuum as low as 20 microns may be required with a decay holding below 200 microns (for these systems, consult the manufacturer if at all possible). Each of these requirements is focused on the acceptable level of moisture remaining in the system, again because at these levels the majority of degassing has already occurred. The time allowed for decay depends upon the size of the system, but generally, 10 minutes minimum with 1 minute added per ton is a good guideline.
The moral of the story is this: A proper evacuation may take 15 minutes, 15 hours, or 15 days, it simply takes what it takes. While removing cores, using large diameter hoses, clean oil, and a properly sized pump will definitely shorten the time required to complete the process, the true time required is a function of the cleanliness and dryness of the system being evacuated.
Evacuation cannot be rushed or shortcut because the consequences are far worse than the lost time in the process. The best and most important thing to remember is cleanliness is next to godliness when it comes to preparation and finally, evacuation. This means keep the system piping clean, your vacuum rig clean, the oil clean, and follow good processes. This is a point that cannot be understated when trying to shorten the time required to complete the process properly.