
My BluVac is reading erratically
Ever wonder what those blue squiggle lines mean on your BluVac reports? Jim will explain what those readings mean and why you're getting them. We dive deep into the AccuTools core removal tools and explain the difference between ours and the competitors. It's a highly informative video that could save you time on the job site.
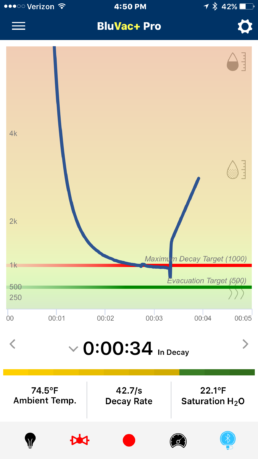
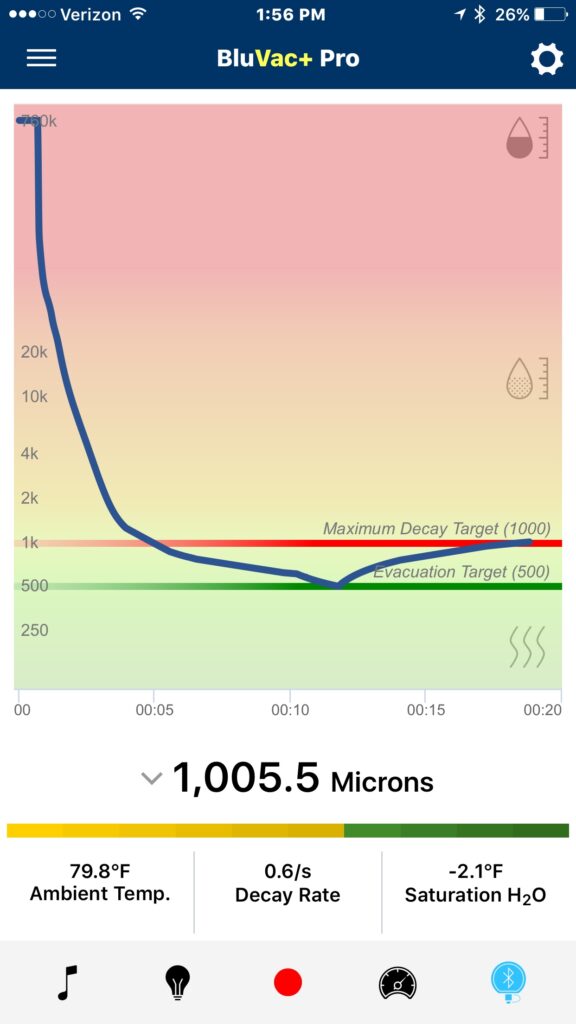
Why does the micron level increase after the valve is closed and the pump is turned off?
You will see leakage because the volume it's holding is so small. The gauge has such high sensitivity, you will see things you would not normally. The only way to alleviate this is to run the pump for a very long time, on the order of many hours or day, or adding heat. Check out the video at about 4 minutes in to hear more about it.
For a more in-depth understanding: All solid materials have an affinity of water vapor. This water vapor "adsorbs" onto the internal metal surfaces of the volume being evacuated. Just like liquid water, the adsorbed water has a vapor pressure. The vapor pressure is dependent upon the number of layers of water molecules adhered to the surface, and the temperature of the surface. The water "desorbs" when the pressure in the volume is dropped below the vapor pressure, but only very slowly - especially at room temperature. When the pump is blanked off, the water continues to desorb, very quickly raising the pressure of the small internal volume. Click here to learn more about water vapor and the properties of moisture.
For gauge confirmation, we recommend...
- Attach the gauge directly to the vacuum pump. A good two-stage pump with fresh, dry oil will pull the gauge to below 30 microns within about a minute or two. If this pressure can be achieved, it is indicative that both the gauge and pump are working properly. A leaking gauge would not allow the pressure to be pulled so deep.
- Attach the gauge to a backing volume (clean recovery tank) with a quality Valve Core Removal Tool. Pull the vacuum deep for at least one hour and blank off the Core Tool. After an initial rise, the pressure should level out over a short period of time - indicating a leak free gauge, Core Tool and connections. A pressure that continues to rise linearly (a straight line up) indicates a leak somewhere in the setup - but not likely the gauge itself.
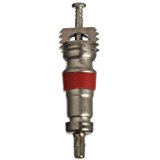
Interested in purchasing a Core Removal Tool?
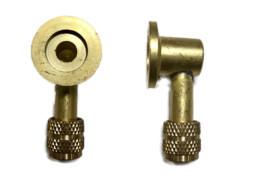
Our New Adapters
Not sure if you noticed, but we've improved our adapters!
If you've purchased a kit after March 1, 2020 you likely have the new adapters. Here's what to look for in the new editions.
New 1/2 Inch Adapter
Old 1/2 Inch Adapter

New 1/4 inch Adapter

Old 1/4 inch Adapter

New Right Angle Adapter

Old Right Angle Adapter

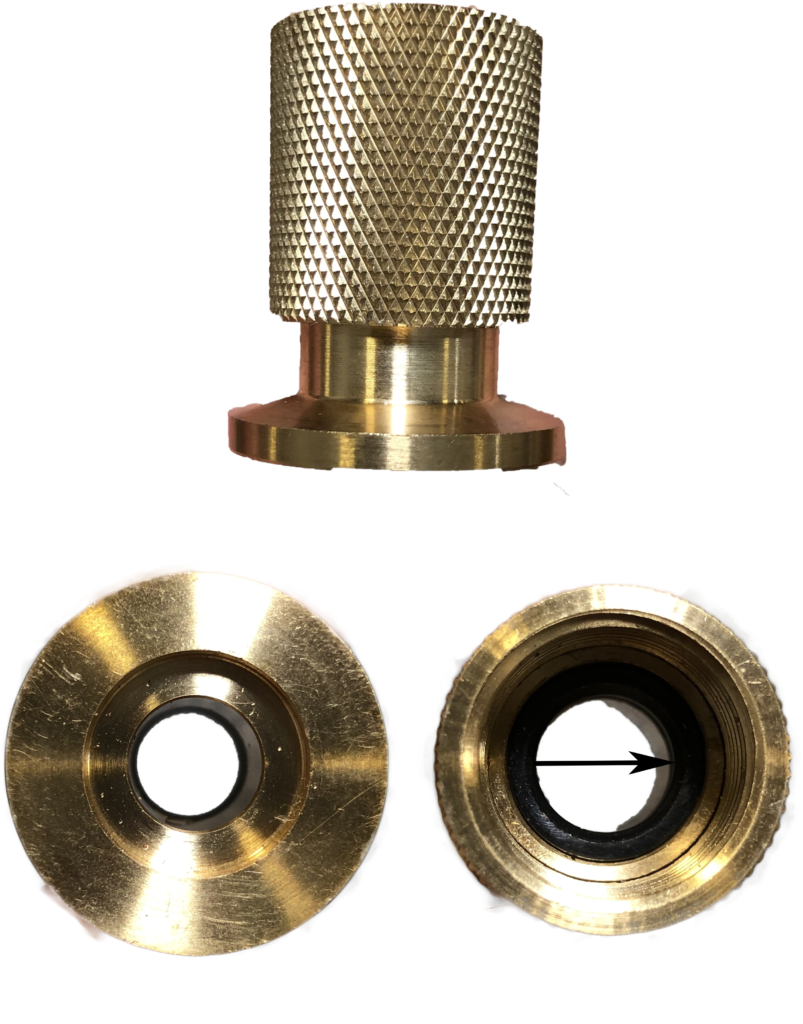
So let's talk facts. If you look closely at the images you will notice the port center is a bit bigger on the newer adapters. You may be thinking, "The wider ports will have faster flow than the older ones." The larger port size does NOT affect the speed of the evacuation. If you need more explanation on why port size doesn't matter, take a look at this video. The port size only matters until 20,000 microns is hit, which is milliseconds worth of time in a normal vacuum.
So you're probably asking yourself "Well why did they change their adapters then?" We made these changes for a few reasons; The newer adapters are a bit more compact, they look better and they have fewer brazing points.

If you're looking for replacement gaskets
Which gasket to purchase?
AccuTools changed the brass adapters in late February 2020; it hit the shelves in early March. The differences between the parts is the older gasket is raised above the lip of the adapter. In the new adapters, the gaskets fit well within the fitting.
Part Number for older adapters SA10868
Part Number for new adapters SA10868-1

Something's leaking
If you're having trouble pulling below 1000 microns, you're not alone. The solution to it might be easier than you think though.
First make sure that the pump is not the issue. Attach a micron gauge directly to the pump to make sure it can pull down to the desired microns.
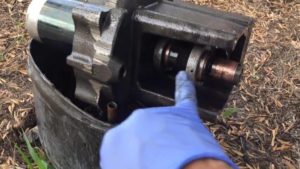
Which core tool are you using? Some off-brand core tools' Schrader's will sit a bit low on the side port, and is sometimes not fully actuated by the core depressor in the coupler used to attach the BluVac.
The core depressor in the coupler is screw-in type. Turn the depressor 2 turns and try again. The partially open schrader does not allow proper gas pressure to be communicated to the sensor.
Stop Screwing Around with Crappy Vacuum Gauges and Step-up to BluVac Technology!
There's Nothing Like BluVac!
There's nothing like BluVac, nothing that competes with BluVac, and nothing that beats BluVac for HVAC and Refrigeration Evacuation. Simply put, patented features you will only find with BluVac protect us from the competition.
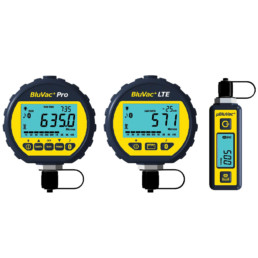
- Highest accuracy and resolution on all our micron gauges (5% +/- 5 micron accuracy, 0.1-micron resolution (BluVac+ Pro) and 1-micron resolution (BluVac+ LTE, Micro))
- Built-in oil sensor -- BluVac+ informs the operator of contamination. Subsequently, can be cleaned easily with isopropyl alcohol.
- Self Diagnostics -- BluVac+ can check its own calibration and inform the operator if calibration is required.
- Self Calibrated -- Full factory accuracy can be achieved simply by placing the BluVac+ in the freezer. No vacuum pump or reference gauge required.
- Analog Bargraph Display (BluVac+ Pro, LTE) -- provides a quick visual indication of evacuation progress.
- Advanced Power Management -- provides up to 300 hours of operation on a single 9V battery (BluVac+ Pro, LTE) or 100 hours on 2 'AAA' batteries (Micro).
- Instant warm-up and instant response.
- Combined with high resolution, it shows precisely what is occurring inside the evacuated volume at any instant in time. Moisture, dissolved refrigerant, outgassing, and leaks are easily detected.
- Wide Operating Temperature and Pressure Range -- BluVac+ is among the very few micron gauges that can operate within full specifications from 10°F/-12°C to 122°F/50°C and throughout the entire pressure range without derating based upon temperature/pressure.
- 1000 PSI Maximum Overpressure -- BluVac+ will not be destroyed (or even harmed) by charging a system prior to valving off the gauge.
The BluVac+ Pro and LTE gauges also include:
- Leak Rate Indicator -- shows the rate-of-change of pressure in units/second or units/minute. This valuable information helps an operator to determine if the rise rate is due to leaks or moisture.
- Temperature Indicator -- displays ambient temperature with 0.1C/F resolution and 0.1C/0.2F accuracy.
The top-of-the-line BluVac+ Pro also includes the following outstanding productivity features:
- Programmable -- automates the evacuation process and rise-time analysis by both pressure and time. Sounds an audible/visual alarm when evacuation/rise-time testing is complete. A rise-time PASS indication can be achieved in as little as 15 seconds, depending upon the condition of the system under evacuation.
- Additional display units: inHg and PSI
BluVac technology was developed over a period of 8 years and launched in October 2010. The main impetus behind the BluVac program was to produce a micron gauge technology that solves the basic problems affecting micron gauges utilized in HVAC service.
BluVac Solves:
- Lack or loss of calibration
- Temperature sensitivities
- Oil/particulate contamination
- Measurement speed
- Power requirements
The patented BluVac technology addresses all of those issues through a combination of a novel thermistor based vacuum sensing technique and advanced digital signal processing via an on-board CPU. Working together, the BluVac gauges provide a highly accurate, high-speed, low power, high confidence solution to measuring pressure during HVAC evacuation. Powerful self-diagnostic capabilities, plus the ability to be recalibrated without any special equipment, ensure that the gauge is always operating to its highest accuracy and performance.
https://patents.google.com/pat
https://patents.google.com/pat
All Bluvac+ products connect via Bluetooth to any Android or iOS device using our BluVac app, or can run stand-alone.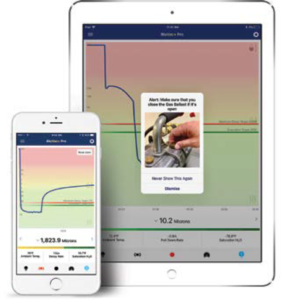

Evacuation of a 2500 ton Centrifugal Chiller
Evacuation of a 2500 Ton Chiller
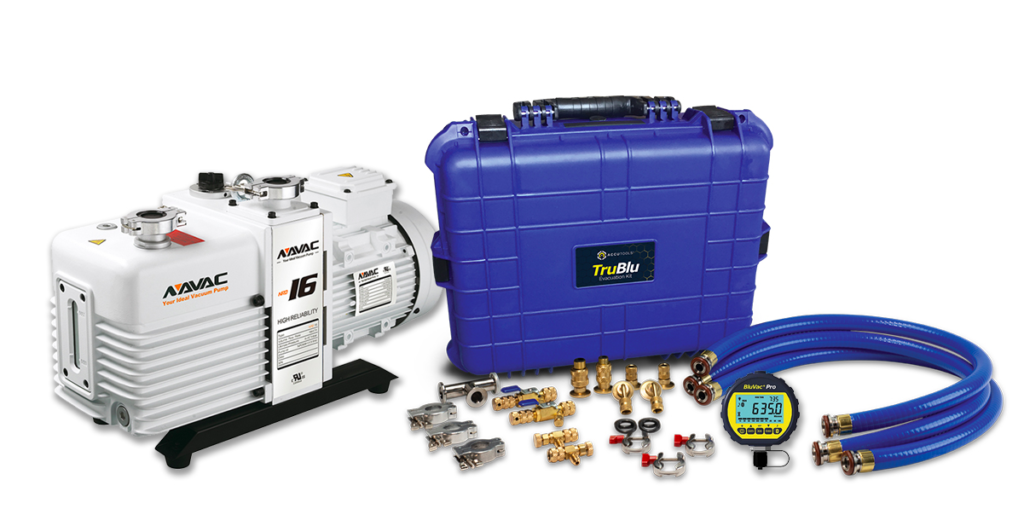
2500 Tons of fun with TruBlu Hoses and the NAVAC NRD16T Industrial Vacuum Pump - 12 CFM!
It's not every day you get to work on a machine this big, and what can I say, it was an awesome opportunity to try TruBlu Evacuation Hoses and a NAVAC16T 12 CFM Industrial Vacuum Pump in a big way on a machine bigger then I have ever seen before.

While I have worked on a lot of residential appliances, the majority of my trade background is large package and 70-700 ton built-up systems, gas furnaces, and boilers. I have participated in many teardowns of equipment of this type of equipment (up to about 800 tons) and I have seen equipment up to 1000 tons, but before this one, I had never even laid eyes on a 2500 ton chiller. To put it into perspective, it was like evacuating the inside of two school buses.
The equipment room we were in was a work of art with over 1,000,000 tons of cooling, we were there with Johnson Controls, Andrew Greaves, and Bradley a master mechanic for York evacuating the last chiller of a bank of three 2500 ton machines.
These machines are R-134a, and typically evacuated to 5000 microns, using a process that some might consider antiquated, but I will say after testing does have some considerable merit. (The old guy might not always know why, but they do often know what has worked in the past and what works). More on that later.
The evaporator and condenser for these machines were about 54 inches in diameter and 28 feet long. This means just in the evaporator and condenser we are talking about 890 cubic feet of volume and the machine had been test-run at York prior to delivery (a very important detail). 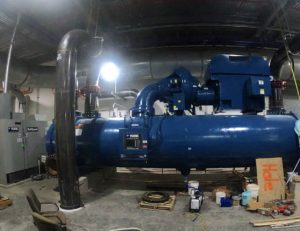
These machines typically are scheduled for 4-6 days of evacuation to reach the 5000-micron level. They are evacuated from a single connection at the evaporator barrel. As the internal volume is so large, the system conductance becomes somewhat negligible, and what you connect to the system to perform the evacuation is most important. We have not decided if pulling from more then one point would even be of any value, as the hose and the fitting conductance speed already surpass the capability of most pumps.
Now the machine was delivered with a holding charge of nitrogen, and it was leak tested with the "trace" of refrigerant left in the oil after testing. We obviously were not dealing with any moisture or ruptured tubes, so freezing water (as there was none present) was of no concern.
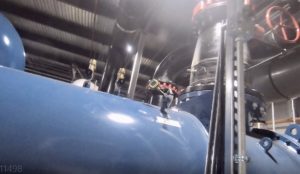
Starting the Evacuation
The Hose:
We used a standard 1-meter TruBlue hose with (1) 1/2" connection, by KF at the pump end. The hose is rated at 16 CFM at 10' of length, so at 3 feet the hose can handle over 50 CFM at 1000 microns. TruBlu is super flexible, has low gas permeation, and a higher conductance speed than any hose on the market today. With the flexibility of fitting ends, we were able to connect directly to the chiller without stepping down the connection.
The Pump:
The pump, provided by NAVAC was a 12 CFM industrial pump with a two-stage ballast, a large oil reservoir with an oil capacity of about 1.75 quarts. The pump equipped with a KF16 fitting at the pump end sized specifically for the TruBlu Hoses. The pump was tested prior to installation and could easily achieve 2-3 microns in a few seconds. I have worked with a lot of vacuum pumps over the years, both commercial and industrial, and the NRD16t is an impressive beast of a piece of equipment. Mounted on a cart, and weighing about 80 lbs, this pump is of exceptional build quality. It is designed for continuous operation and is ideal for long pulldowns like that of this job. With the addition of the TruBlu hose, we could still easily achieve 3-4 microns at the hose end. We had a micron gauge at the pump for pump testing, and on the condenser barrel on the far opposite side to measure system vacuum. We were curious how much difference we would see from one side of the system to the other.
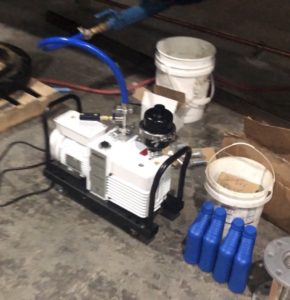
The NAVAC 12 CFM pump is not a standard vacuum pump. It is designed specifically for industrial and medical applications, so between the pump and the oil (designed specifically for the pump), I have seen nothing on the market like it. The pump did a tremendous job handling the refrigerant without dilution of the oil and had a continuous capacity that I had never seen in a pump before. It is designed for continuous duty, and the entire evacuation was done without a change of oil. At the end of the evacuation, the pump was still pulling 3-4 microns indicating the oil was still in very good condition.
The NAVAC NRD16t is also equipped with an inlet strainer, and an oil vapor arrestor to handle any oil vapor the pump might produce. The entire time, the pump did not cloud the equipment room with oil, but we did notice about a 1/4 quart reduction after 17-hour continuous pumping.
Holy Evacuation Batman!
With everything hooked up, we started the pump, and boy did this thing hog some air! Now before I go too far, I had run some initial calculations and considering the volume and I expected to wait no less than an hour to see any indication of vacuum. Here we were, less than 45 minutes in and we were approaching 3,000 microns of vacuum. Impossible you say? You would be correct!
Now for the rest of the story. Remember, I said "test run at the factory" and you might start to have an idea of what we were witnessing. When a chiller of this size is recovered, even if the required levels are met, the oil which is missable with the refrigerant is still holding a lot of R134a refrigerant maybe even upwards of 100 lbs. Although the oil was drained for shipment, the factory trained tech on the job estimated at least 5 gallons was still in the system.
If you have every exposed a vacuum sensor to a refrigerant, then you would know what we were seeing. As there was a very quick drop, then a gradual rise as the refrigerant was exhausted and the environment went from "refrigerant laden" an environment of essentially nothing. Yes, at first even I thought we had a leak, especially after barely touching the valve stem on the condenser barrel where the micron gauge was installed resulted in a sharp spike in the vacuum level.
We decided at that point to break the vacuum with nitrogen and see if we could carry out some of the refrigerant gas and restarted the vacuum about 3:00 PM.
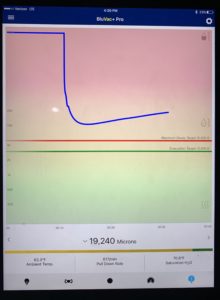
The second go-around was much more like I expected. A considerably longer delay before we even started to indicate vacuum. Again though, after an initial deep draw, we started to again see the effects of the refrigerant, although this time at a much higher level. Just to confirm, I called Dennis Cardinale of Accutools to confirm what in fact what I was seeing was the effect of refrigerant. At that point, I did not really care how much experience I had. I simply wanted confirmation that what I thought I was seeing was the likely culprit.
Nothing To Do But Wait.....
Asking how long an evacuation will take is like asking how many licks to get to the center of a tootsie pop. The world may never know. But what we did know was whether the environment was air or refrigerant, eventually, it would converge as the atmosphere was removed and the vacuum gauge would start providing accurate information. This is characteristic of all thermal vacuum sensors no matter what the brand. The advantage with BluVac was however was we were able to document it. At that, we headed back to the hotel for the night and decided to meet up at 8:00 am to see our progress.
Old School but Cool!
Sidebar
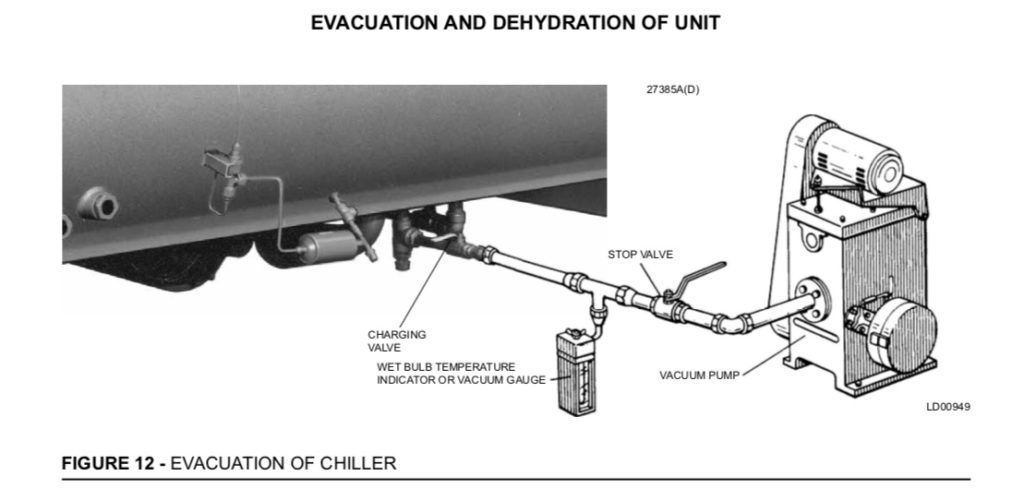
If you read the York Chiller installation manual, you will see reference to a wet-bulb gauge that was used to perform the evacuation. Essentially a test tube filled with Methanol equipped with a thermometer to indicate vacuum based upon the boiling point of the Methanol. They are still made today under a brand called Vac-U-Ator, an almost unheard of older technology (maybe only outside of York) but it still has merit.
What the old guys knew or noticed was the same characteristics of vacuum with thermal gauges that we experienced, and I am guessing that they also noticed that the old method simply did not indicate vacuum under the same set of conditions.
Now that said, you will notice that a vacuum gauge can also be used for this process, and that is what I would recommend, but I am guessing that the old school technology would not indicate vacuum due to refrigerant pressure unless a deeper vacuum was truly present. So for roughing levels of vacuum, maybe to 1000 microns, you can see that this might be a very good indicator. I am still not sure why York allows a vacuum of 5000 microns on this machine as it does contain POE oil, but I am guessing that it is acceptable as that is what was in the IOM. The contractor wanted to go down to at least 500 microns with a decay no more than 1000 microns over an 8 hour period. A deeper vacuum simply provides better dehydration. So how can you easily differentiate between refrigerant outgassing and a deep vacuum with a thermistor vacuum gauge? Simple, in a deep vacuum, there is little to no exhaust from the outlet of the pump, and yes, I realized that in hindsight. Hindsight is always 20/20.
Things we learned!
- Consider the environment, the refrigerant environment. Refrigerant will mess with your vacuum sensor until it is gone. If you feel gasses coming from the pump outlet, and you are indicating vacuum, you are still outgassing refrigerant. This is not as noticeable in smaller equipment simply because the atmosphere is removed so fast.
- Vacuum decay times take much longer on larger systems. Do not try to determine if the system is dry and tight in any less then 4-6 hours. My advice, heed the manufacturer's instructions. Vacuum pressures stabilize very very slowly. The pressures are extremely small. Don't rush this step.
- Use a good 20 amp outlet when you are using a big pump! We found out the hard way. The pump would start then immediately stall due to voltage drop. Moving to an outlet closer to the panel and using a 10 gauge cord resolved the problem.
- You can get the job done way faster then you are used to! We cut the time between 82 and 88% to achieve a vacuum 16 times deeper than required. (We are going back to do it again so we can see how long to get to the manufacturer's required vacuum levels)
The Final Vacuum
Less then 24 hours after we had started the second pull-down, the results were nothing less than impressive! How impressive? I will link to the video as soon as Andrew posts it here.
Interested in tools we used? Find the TruBlu Professional Kit and NAVAC NRD16T Here.

The Hole Truth about Evacuation Hoses
Now we don't often try to poke holes into the competition, but when they do it themselves... it is worth noting.
Much, if not all, the industry uses a refrigerant transport hose for evacuation. While some of the larger diameter hoses offer scant advantages such as higher conductance speeds - they were never intended or designed for deep vacuum or evacuation.
A refrigerant transport hose is multi-layered, intended and rated for pressure. The materials used are in many cases gas permeable which requires venting of the outer hose-layers to prevent bubbling and bursting under pressure. If you closely inspect these "vacuum rated" hoses you will see holes pricked about an inch apart throughout the entire length. This is called Hose Pin Pricking.
"Pin-pricking a hose cover permits trapped gases or vapours to escape from the hose carcass. Steam, air, and other gaseous products can permeate (pass slowly) through the tube and will build up in the reinforcement area - so the manufacturer must “pin-prick” the cover on certain hoses" New Line, What Does Pin-Pricked Hose Cover Mean?, https://www.new-line.com/information/what-does-pin-pricked-hose-cover-mean, last accessed August 2nd, 2018.
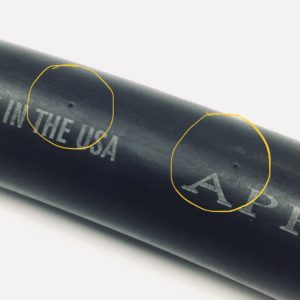
Like holes, permeability is a two-way thing. This is because a hole is not a check valve. Now it is important to realize that these holes are not through holes, that is they only pierce the outer layer. However, the sheer necessity reveals a lot about the materials from which these hoses are made and gives us some insight as to why they do not perform very well in a deep vacuum.
In vacuum speak, conductance speed is where it's at. Large diameter hoses provide higher conductance speeds which remove atmosphere many times faster than skinny hoses. Larger diameter hoses result in lower friction. But while bigger is better, that is only part of the equation.
Vacuum is a two-part process, degassing and dehydration. While a large gas permeable hose might get the bulk of the atmosphere out quickly, it will not perform as well in a deep vacuum. Not being able to achieve a deep vacuum means limited or slower moisture removal. As the liquid line dryer has a limited capacity, getting as much moisture out of the system as possible is critical.
Because moisture removal is the most important step in the evacuation, it is not a step that should be taken lightly or overlooked. Air or non-condensables will simply cause issues with performance. If you were to introduce nitrogen into a system, for example, it would drive up the head pressure and lower the efficiency, but it likely would not cause any damage to the system or its components.
Moisture, on the other hand, is a different story. Moisture combines with refrigerant causing hydrofluoric and hydrochloric acids as well as other compounds like sludge that will irreversibly damage the equipment.
That brings us to an engineered solution. When designing TruBlu it became apparent that no other vacuum related industry used transport hose for evacuation, and one could only wonder why. The reason is simple; it just does not work very well for deep vacuum. If you own a "vacuum rated" hose test it against the TruBlu and experience the difference.
Sorry in advance to those left wondering how that nice black 20-micron rated hose cannot seem to achieve 20 microns.
Is there a "hole" in that theory? It's up to you to test for yourself. Simply attach the vacuum gauge to the end of each hose one at a time and see how deep they pull. The difference will be obvious.
TruBlu uses technology from the scientific and industrial vacuum communities where deep vacuum matters, and evacuation time is often one of the most critical requirements. Process evacuation is all about moving product down the line, and not having it come back due to improper or insufficient evacuation.
With TruBlu you get it all. Not only is TruBlu bigger and faster with initial pulldown, but it is also significantly faster at removing moisture, achieving deeper vacuums, and ultimately, dryer systems.
If you are using "transport hose" for evacuation, it is time for an upgrade! If you are using transport hose in parallel with TruBlu hoses, expect a drop in overall performance. A vacuum rig is only as good as its weakest link. While you will see a significant increase in speed due to conductance gains with the TruBlu hose, a refrigerant transport hose will permeate enough to significantly impact ultimate vacuum, likely to the tune of 100 microns or more! Not only will it save you a ton of time, systems will last longer and run better. Not to be a "prick" that, my friend, is a fact.

Identifying True Leaks in a Vacuum
Vacuum leaks have led more than one technician deep down the rabbit hole, wasting hours upon hours, pressurizing the system with nitrogen—or nitrogen and a trace gas—leak testing with electronic leak detectors, and soap bubbles, removing panels to check evaporators, condensers, and other components that are buried in places that are not easy to get to nor fun to go. Hours have been spent watching a rock steady standing pressure test, leaving the technician to dream about a magical particle that is blocking some torturous leak while under pressure, and then when under a vacuum air rushes in, never letting the system reach or hold an acceptable level of vacuum. Even worse, are when those leaks win and the technician hastily dumps the refrigerant charge into an improperly evacuated system. A guarantee that someone will return for a much more time consuming and costly repair in the near future.
The evacuation can stall or rise during a decay test as refrigerant outgasses, moisture boils off, components outgas, or trapped gasses are released from o-rings, threads or flange gaskets. This outgassing can mimic an apparent or "virtual" leak in the system, something no one wants to see.
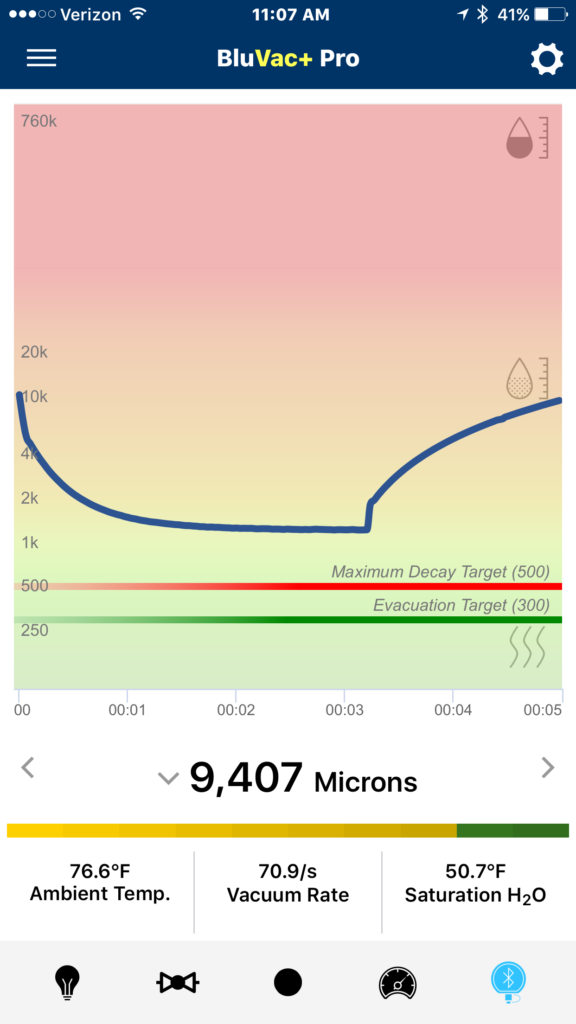
With typical vacuum gauges, there is no way to definitively tell the difference between a real and virtual leak, and there is a very good reason why. Most vacuum gauges, whether analog or digital are logarithmic scaled, meaning they have many different scales or characteristics as they move through different stages of evacuation. Even those that advertise full range single micron resolution are subject to varying accuracy, making them non-linear in nature as they approach their ideal range of measure. What this means is on a graph or LED display, the manufacturer is trying to display a huge range approaching 1,000,000 microns (760K to be exact) on a very small digital or analog display. This squishes all that information in a very small area, changing how it is displayed and hiding some very significant information about what is really happening during the evacuation and decay process.
Decay testing has been used for as long as I can remember to "try" and identify leaks in a vacuum. For me, this process has proven fruitless, frustrating, and more confused than anything because of the science as taught simply never works. In textbooks, a real leak and a virtual leak have very different characteristics making them easy to visually identify while in field practice, it is like trying to identify shades of gray in the dark, you simply cannot tell the difference.
Let There Be Light!
Doing projects like application development with the BluVac+ Professional leads to a lot of testing, and for me, testing means attempting to make the science work. The difference between a real leak and a virtual leak (degassing) should be very apparent and, lo-and-behold, it is if you look at it in the right light. Not only is it apparent, but it is likely the most useful feature of a vacuum gauge aside from total pressure indication (vacuum level) that I have ever found.
Looking at a vacuum in the right light was a simple yet so complex that it was not possible until we attached a smartphone to a vacuum gauge. Unrestricted in user interface design by lights or an analog display, we could for the first time change the way the information was viewed for different elements of the evacuation process. Far from complex, it was as simple as going from logarithmic to a linear display during the decay test.
Now for you engineers and mathematicians in the group, I don't expect this to be an epiphany, but for those of us that don't use logarithmic scales every day or at least me, it certainly was an ah-ha moment. What I had been looking for was hidden, and masked. Not only was this hidden in our design, but literally that of every vacuum gauge that I have ever used. One small change in how the data was displayed revealed what had been hidden from me for over 30 years, the difference between a real and virtual leak in a system. Because of the logarithmic scale, the decay always visually indicated tendencies of a tightly sealed (but dirty or wet) system that simply needed further evaluation. The tell tail signs of a leak were mathematically hidden from view. Solving one problem, (showing a million of points of information on a single interface) had led to another which was losing characteristics that were critical to solving the actual vs apparent leak problem.
For a service technician, this is a HUGE step forward in evacuation technology because the difference between a virtual leak and a real one are now easily distinguishable in seconds by the means of the app. This means now you know if you simply need more time on the pump, or your system is actually leaking, making a pressure test and a leak test truly necessary. For technicians, this means potentially hundreds of hours saved annually during the installation and service process.
Telling the Difference Between a Leak and "Virtual" Leak
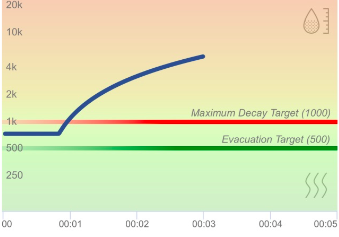
As a system is evacuated, many times the process will stall. The stall happens due to moisture as dehydration is occurring, stalling or slowing the evacuation until the moisture is removed. The question for the technician becomes "is the system simply stalled due to moisture or outgassing, or is there a leak in the system that the pump cannot overcome?"
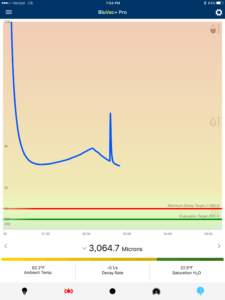
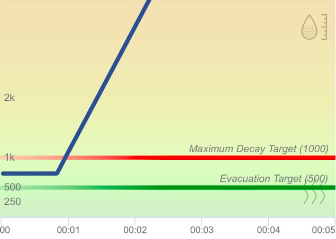
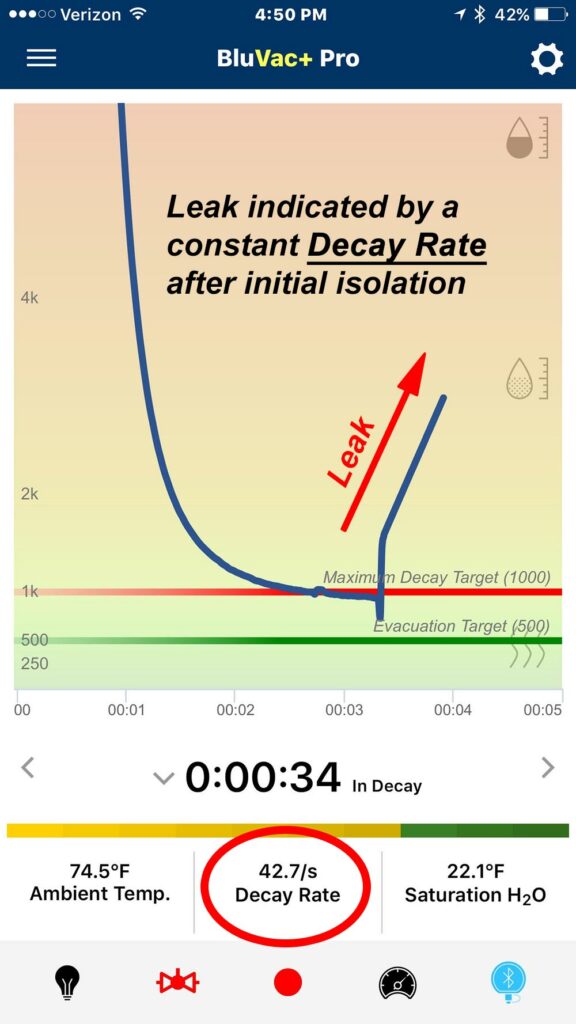
Now as you will see, on a linear graph this is as black and white as it could ever be. For system (A) below, when the vacuum rig was isolated, you will notice a rapid rise, then a continued rise at a steady rate. This can easily be explained by the fact that with a leak, the air infiltration will happen at a reasonably steady rate provided the system is reasonably below atmospheric pressure. Remember even at 10,000 microns, 99% of the atmosphere has been removed and we are well into a vacuum. Even at these higher levels, a leak can easily be detected.
System (B) shows the characteristics of a virtual leak. There is still a rapid rise at isolation, but now the rise starts to tail off and eventually will rise no more. This characteristic becomes more pronounced at lower vacuum levels when larger hoses are used as considerably more vapors evolve until the system becomes "clean" and degassed. A clean tight system will flatline at isolation because it is clean, dry and tight giving you a good indication of the overall system cleanliness and condition.
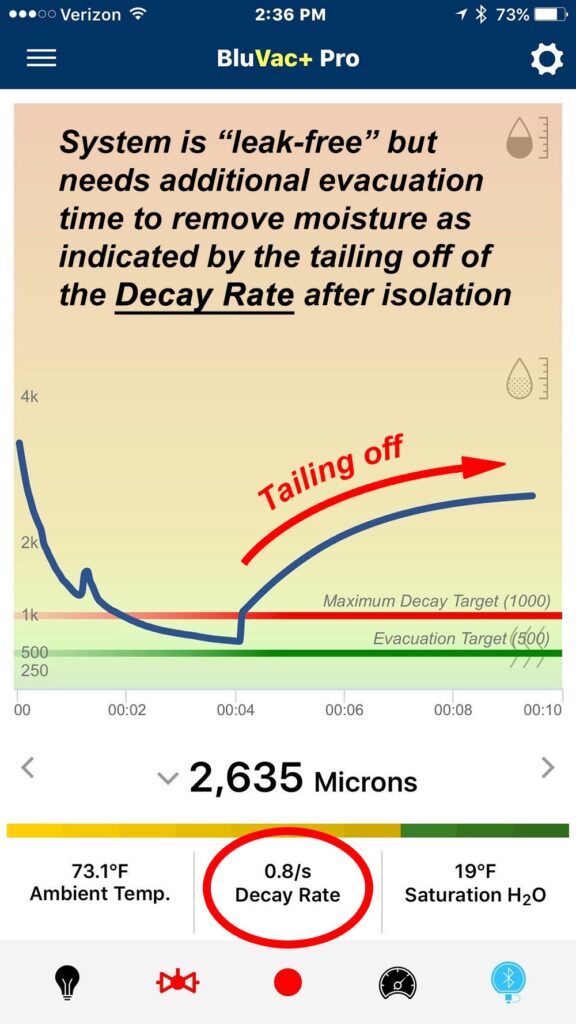
This feature of the BluVac+ Professional can easily be accessed at any time by simply isolating the core tools, and tapping the isolate button on the application. The graph will rescale, and in about 30 seconds you will have a definitive answer about what is happening in your system. Leak detection in a vacuum has never been easier. Another great reason to have the BluVac+ Professional in your toolbox.

Can You Pull Moisture from a Filter Dryer with a Vacuum Pump?
The purpose of evacuation is degassing and dehydration, which often leads technicians to think that they can simply pull any moisture from the dryer during the evacuation process without the need to change it—a potentially very costly mistake.
Let me start by saying we are in the service business, and there is nothing wrong with charging and getting paid for good service. Good service includes doing what is right and in the best interest of your customer, and changing filters dryers when a system is open for service is good practice. Changing a dryer could very well be the difference between a system lasting for 5 years and a system lasting for 20. Consider the filter dryer a small investment, no less important or costly than a throwaway filter when you consider the damage not changing it can cost.
Trying to evacuate a dryer to remove moisture is like trying to vacuum dirt from a furnace filter. A good technician would never do it. You will never get that filter clean to a like new condition, and it is a waste of time and money on what is considered a disposable item. Just like a vacuum cleaner would only remove the surface dirt from a furnace filter, evacuation also only removes a small portion of moisture from a filter dryer compared to its true moisture holding capacity. In addition, the evacuation does nothing to remove the solids and solubles that the dryer is holding—a real concern for trouble-free operation.
A dryer is required on systems containing POE oils because evacuation alone will not reduce the parts per million (PPM) of moisture to a level that is adequate for trouble free operation.
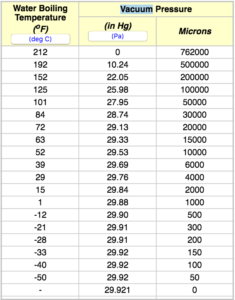
Let's start with this: no matter how long you evacuate a system, and no matter how deep the vacuum, there is still moisture in the system. As can be seen on Fig. 1, at a vacuum of 500 microns the dewpoint is -12°F. This means that if a section of the system dropped below -12°F, moisture that is in the system would start to condense on the interior piping surfaces.
When many technicians think of the pitfalls of moisture, they get fixated on it freezing and creating a system restriction. Formation of ice and blockage of a metering device can and does happen, but in reality what a technician should be concerned with are the chemical reactions that are occurring due to moisture in the system.
In reality, the dryness of the system, according to Emerson Climate systems, should be less than 50 ppm or 3% relative humidity. In air, this means dew point temperatures as low as -60°F. As can be seen again from the chart—even approaching a perfect vacuum—these dew points are not achievable with a field vacuum pump and this is where the dryer plays a critical role in final dehydration.
Desiccants in the dryer trap moisture drying the system. POE oil has an affinity for moisture, 100 times more than that of mineral oil. POE oils do not readily release moisture in a vacuum, and the dryer is the safety net for the system. At moisture levels above 75 ppm, chemical reactions with moisture and oil start to occur. These chemical reactions can cause unwanted chemistries that cannot be undone: hydrolysis of the lubricants, corrosion of metals, copper plating, and a chemical change in the motor insulation of a hermetic compressor. A good filter dryer will hold that moisture and prevent chemical reactions that would occur in the hottest parts of the system.
Beyond the chemical reactions, there is also the "filter" portion of the filter dryer that must be considered. Keeping the system clean and free of foreign contaminants that can damage compressors and/or capillary tubes is the best way to assure long term, trouble-free operation. The contaminants can be solids such a copper burrs from installation, excessive flux, dust & dirt, copper oxide from brazing, or soluble contaminants formed from the chemical reactions, such as acid, water, resins and wax. Once the filter is used to its capacity, many of these contaminants will simply continue to circulate through the system.
The moral of the story is this. When a system is opened for service, the filter dryer should always be changed. In addition, it is a good idea to also install a moisture indicator like the Emerson HMI so you can determine the moisture level. As removal will take several days, at least 48 hours of continuous operation is required to determine if the system is dry. To avoid a return trip, you can easily have the customer visually inspect the indicator (if it is easily accessible) to determine if the dryer will need to be replaced again. Moisture will cause system failure, and it must be removed.
Changing the dryer does not need to be hard or complicated. Many times you simply need to pump down the system without the need for a recovery. Changing a dryer by EPA definition is considered a non-major repair. You can also isolate the condensing unit with the service valves and simply recover refrigerant in the line set and evaporator on systems that are not conducive to pumping down—like microchannel systems. This will significantly reduce the recovery and evacuation times, lowering the cost of repair.
For business owners, an important piece of advice. If you want technicians to change dryers and add moisture indicators, when a system is opened for service, keep them well stocked on your service trucks. It is a lot less likely that corners will be cut, and revenue lost, when the parts needed to make a proper repair are on the service vehicle. Keeping some simple acid test kits will also allow for simple testing and easy identification of systems that are in need of repair before a catastrophic failure occurs.
One last important note, always cut out the dryer with your tubing cutter, do not sweat it out with your torches. Moisture is driven from the desiccant with heat, the same process used during filter dryer manufacturing. Heating the dryer will drive the moisture out of the dryer and back into the system, undoing all the work that the dryer has done. If you are so inclined, a flare dryer can be used during cleanup for easy removal and installation. After installation, the system should be evacuated to 200-500 microns and put back into service. If you can achieve your target vacuum but, after isolation, the system continues to decay to the moisture region (1,500-2,000 microns), you know the system is tight but wet and may require several dryer changes. You might not be able to make any more headway with your vacuum pump! Don't fret if the moisture indicator does not immediately indicate that the system is dry. Removing moisture takes time, and may only be removable with several filter dryer changes. Again, after dryer replacement, recheck the system after at least 48 hours of operation.
The Pitfalls of Bad Vacuum Gauge Placement
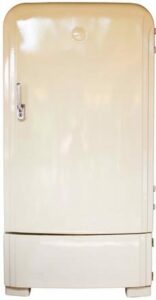
Have you ever wondered why your old refrigerator never needs service, gauges installed, and can run for 30 years that way maybe only needing an occasional cleaning of the condenser? For crying out loud, utilities are buying these old energy hogs through some programs because they never seem to die. Why do they last so long? A good evacuation, a correct refrigerant charge, and maintaining a sealed system. Evacuation is the most important part of an installation followed by charge and airflow to assure the efficiency, reliability, and longevity of equipment.
When it comes to evacuation, in an industry plagued with bad information, I do not know why I was surprised to learn that many technicians think it is OK to measure the system vacuum at the vacuum pump. Now I wouldn't say it's like driving from the back seat of a car, only because it's much worse than that. It's more like driving blind from the trunk. In my opinion, a senseless practice, and simply poor practice when it comes to proper evacuation. If you hate your micron gauge and think that evacuation is impossible or dark magic, I think we have stumbled across the reason.
Now I am not going to blame technicians for this, as somewhere along the line, (likely when the marketing department took over engineering) the 1/4" test port on a vacuum pump became a service port for evacuation and at times a mounting point for the vacuum gauge and the pump blank off valve became the isolation valve for vacuum. I know this is true because I have talked to many salesmen at tradeshows who have confirmed this to be their understanding.
But here is what is important to understand, the 1/4" test port is nothing more than that, it is a test port. It is designed to provide a port to test the ultimate pulldown vacuum of a vacuum pump. It is not, and was never intended for evacuation or a permanent location for the vacuum gauge, and the blank-off valve is not intended to isolate the vacuum from the system.
Let's start with some basics. Pressure and vacuum are two completely different sciences and cannot be treated the same. Here is a fundamental example. Given a straw, you could easily blow out a candle a foot or more away. Take that same straw and try to suck the candle out, and even inches away it is not possible. Vacuum is not directional, if you have ever used a cracked straw, you know they are pretty much useless for drinking. The vacuum pulls from wherever it can. A vacuum is simply a reduction in pressure, and it is strongest at the pump inlet and gets weaker and weaker as it moves away from the pump toward the system. This is due to friction and leakage, which means the vacuum is weakest at the furthermost point away from the pump.
The pressure differences are extremely small that create the flow back to the vacuum pump. These pressures are typically as low as .002 psi. Remember, a vacuum is limited by physics. The deepest vacuum we can achieve is -14.996 PSIG. That said, the only way to reduce the friction and increase the flow is larger hoses. A 1/4" hose has such a low conductance speed that it should never be used for evacuation. Using a 1/4" hose chokes the vacuum pump—no matter how big—down to about 0.5 CFM at 1,000 microns. Hoses that are 3/8" or 1/2" inside diameter are the smallest that should be used for evacuation. That said, the vacuum at the hose inlet can be much more different than the vacuum at the pump connection, and again, much more different at the far end of the system.
 But wait, there's more! Schrader cores provide additional pressure drops, and we all know there are times when
the core depressor either does not open or barely opens the Schrader valve. This will also play havoc in the evacuation process. These pressure drops, again, will make the vacuum at the pump much deeper than it is in the system. The reality is your pump could be at 250 microns while the system is still well over 2,000 microns. This could lead to catastrophic failure of the refrigeration system over time.
Vacuum pump blank off valves leak! Vacuum pump blank-off valves are designed for nothing more than keeping the oil in the pump when the pump is turned off with the hoses connected, in the case of a tip over, and to keep the oil from absorbing large amounts of moisture while the pump is stored. They are not vacuum rated, and if tested with a micron gauge, most–if not all–will creep toward atmospheric pressure in a matter of minutes. This is the primary reason for vacuum trees with vacuum rated ball valves. Those are intended for that purpose. They are not there only to provide a connection point for multiple hoses. The blank-off valve on the evacuation tree, or evacuation manifold, are less than ideal for system decay testing as it also does not isolate the core tools and hoses that are also a significant source of potential leakage, if for no other reason than simply the huge amount of connections. The reason the blank-off should be closed during isolation is to keep the oil from sucking out of the pump when the vacuum rig is under a vacuum and the pump is off. If you are testing the ultimate pulldown of the pump with a micron gauge, closing the blank off prior to shutting down the pump is critical as you will easily pull oil into the vacuum gauge if you shut the pump off before doing so.
So what is a technician to do? After all, there is no other convenient place to install the vacuum gauge on a typical system, there are only two ports on the entire residential system. The answer is vacuum rated core tools. Using core tools allows two important things to happen. First, removal of the core which is a significant restriction, and second, it provides a place for the vacuum gauge that allows isolation of the vacuum pump and hoses. While a core tool is not 100% leak free, down to about 20 microns, a good core tool will not be a significant source of leakage when the valve is closed and the system is isolated. Core tools should be cycled several times during evacuation to release any trapped air around the valve, but aside from that, the only source of leakage during isolation at that point is between the ball valve and the service port on the system. If a non-permeable connector is used for the vacuum gauge, the source of leakage not has been significantly reduced if not for all intensive purposes, completely eliminated.
Just recently I was reading a post online that "vacuum rated" is nothing more than an industry buzz term. Nothing is further from the truth. Everything leaks, even solid copper lines! It is the leak rate that we are concerned with. Vacuum rated defines the performance under a vacuum and clarifies the leak rate of the core tools or the hoses tested. It tells the user the ultimate vacuum that the tool will perform to without the leakage rate overcoming the ability of the pump at the rated micron level. Vacuum rated means it was tested for the process of evacuation and can be expected to perform adequately down to the rated level. This does not mean that standard core tools cannot be used, but it does mean that the user should test them for the intended purpose to assure that they are tight enough to perform without being a significant source of a leak in a vacuum.
Because hoses, the vacuum pump blank-off valve, manifolds, and core tools leak, we need to either remove or isolate as many of these components as we can from the system during the decay test. Just to be clear, evacuating through a manifold is not a great idea either, as the small porting and hoses also are a significant restriction. Core tools, and a proper evacuation rig allow a good evacuation to happen. Making a few small changes in your approach to evacuation will make a huge difference in your frustration level, and make the system last years longer.
PS. Open the gas ballast if equipped before starting the pump, close it when you hit 1500 microns, then open it again after you have isolated the pump/rig for a few seconds prior to the pump shutdown. This will help keep your oil dry, and assure that you achieve maximum vacuum during the evacuation. It will also help your pump last longer.